Creating Your Own Agent#
Verdalia is an organic workspace, that allows you to create your own workflows, and automation pipelines that suit the way you work.
One of the most important parts of a personal system is the personal AI assistant, which allows you constant access to data both inside and outside of Verdalia on the go, and can operationally accelerate your workflow, and allows much easier access to all your systems.
A simple AI agent#
An AI agent is not that complicated. At its core, it is built from a few things:
- A way to receive and send input (such as Telegram, or Discord)
- A way to store and retrieve conversation context
- Tools to interact, read, and write to the outside world, allowing the agent to access data, and mutate state.
- The AI agent node itself
What makes an AI agent powerful is the tools that allow it to access its systems, and the harness it runs on, which can be anything from simple, to enormously complex.
What you will build#
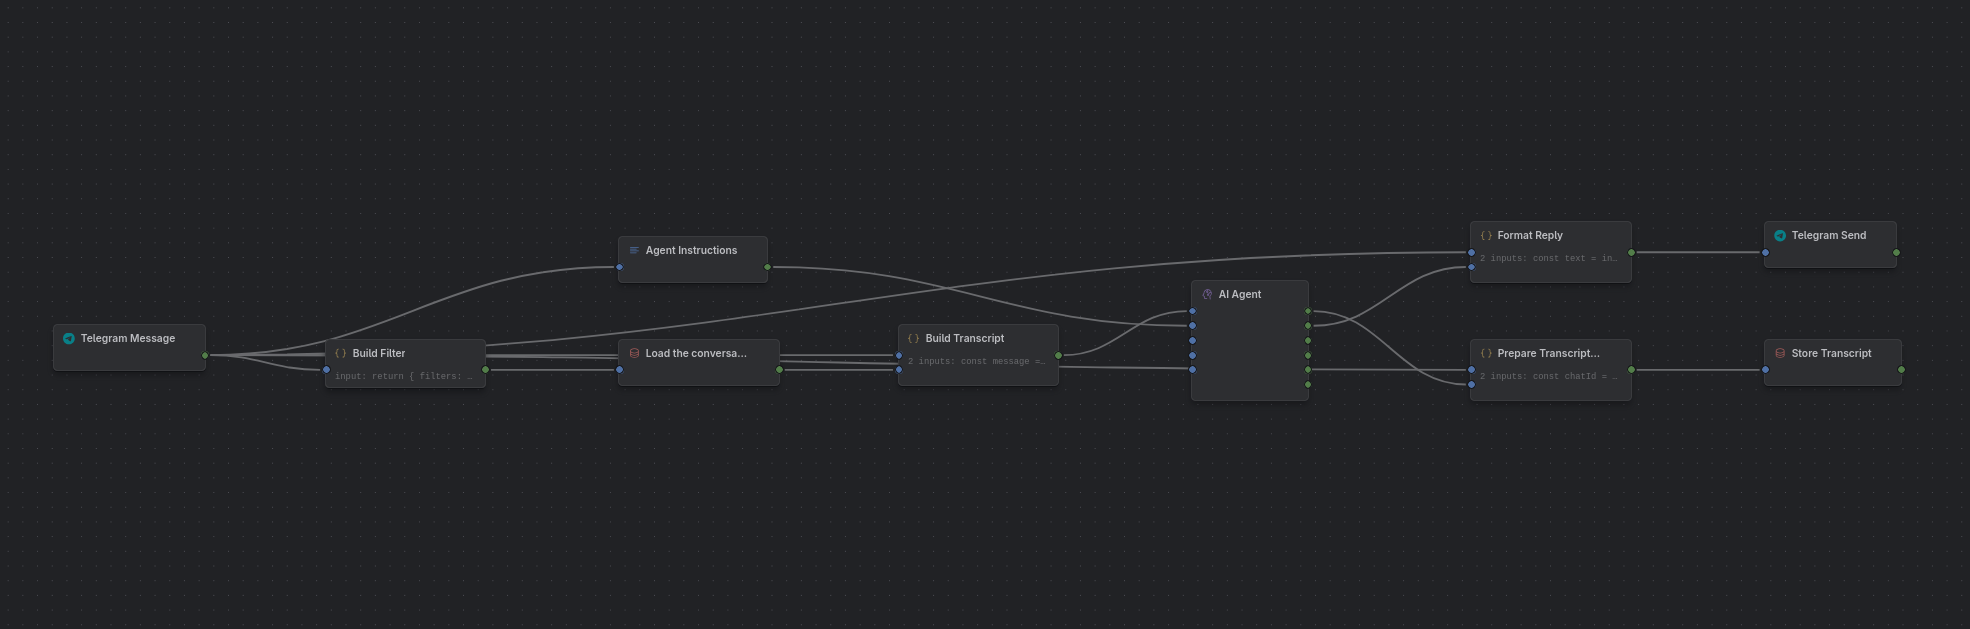
Prerequisites#
To begin with, you need to create a new bot in Telegram (or another messaging service, like Discord).
Open Telegram, and start a chat with @BotFather. Send /newbot, which will ask for the new bot's name and username, and will return the API token: a long string shaped like 8123456789:AAF.... Treat it as a password, it allows you to control the bot.
To add it to Verdalia, open Settings, then Connections, and add it as a new Telegram Bot connection, with a suitable name to remember it later. This allows nodes to address this connection securely, without exposing, or hardcoding the API token each time, and also makes it easy to exchange to another API token in future.
Then send the bot a message from your own Telegram account. A bot cannot open a conversation with you, so this first message is what brings the chat into existence.
You will also need an AI API key of your choosing, which can be added as a connection in much the same way, using your favorite provider, such as DeepSeek, Claude, OpenAI, or Kimi.
Setting up the Workflow#
1. Create a table to store the conversation history. The agent needs somewhere to keep conversation context between messages. Open Tables, choose Create Table, and set Name to Agent Conversation Data; the handle agent-conversation-data is minted from it. Declare three columns: chat_id as Text, transcript as JSON, and updated_at as Date and time. Every row is one Telegram chat, and the row id will be the chat id.
2. Add the first input node Create a workflow and add a Telegram Message node. Select the connection you just made and leave the mode on long polling. When the bot receives a message, this node will start the workflow, and output a value containing the chat_id, text, caption, from, and message_id.
3. Load the conversation. The agent needs the transcript for this chat, and only this chat.
A Table node's configured filters are literal values, not templates, so {{ input.chat_id }} typed into a filter is matched as that exact text and finds nothing. To filter on something from the message you turn on Dynamic Filters and hand the node its filter list at runtime. Add a JavaScript node connected to the Telegram Message node:
return {
  filters: [
    { field: "id", operator: "eq", value: String(inputs.input.chat_id) }
  ]
};
Then add a Table node after it, pick Agent Conversation Data in its table dropdown, set the operation to Query, turn on Dynamic Filters, and set the limit to 1. This loads the previous conversation when a new message arrives.
Note: the node is strict about the shape of that object, and deliberately so. A filter is { field, operator, value }; an object that omits filters, a filter missing its field or operator, an unknown key inside a filter, or a filter list sent while Dynamic Filters is off all fail the run. Each of those once passed quietly and returned every row, which is the failure that makes an agent answer using someone else's conversation. The one shape that does not fail is an input carrying nothing at all, which is read as no filters and matches every row, so wire that socket. If you want every row, say so with filters: [].
4. Build the message list. Add a JavaScript node with two input sockets, message and conversation. Connect the message node to message and the Table node to conversation. This node will assemble the conversation and the new message into the message transcript we will send to the agent.
const message = inputs.message;
const conversation = inputs.conversation;
const transcript = conversation.length === 0 ? [] : conversation[0].transcript;
const text = message.text ?? message.caption ?? "";

if (text === "") {
  throw new Error("A non-empty text message is required.");
}

return [
  /// reconstruct the message history verbatim
  ...transcript,
  { kind: { type: "user_message", content: [{ type: "text", text }] } }
];
5. System prompt and personality Now it is time to give the agent some personality, identity, and instructions, which dictate how it will operate, interpret requests, and what tone it should have (should it be funny, quirky, or stone cold serious? You decide).
Add a Prose node and connect it to the message node (the specific input is receives does not matter, since it returns a fixed output). When writing instructions, prefer being short and to the point, and lead with examples and persona over specifics. An AI agent behaves better when it is given a role to fill, instead of arbitrary rules to follow that encompass a role.
You are a personal assistant to the user's living workspace.

You help organize tasks, research, planning, scheduling, and knowledge.

Default to conversational. Only take action when the user explicitly asks.
If a tool fails, surface the failure instead of retrying it repeatedly.

Tone: calm, mentoring.
6. Add the agent. Add an AI Conversation node. Choose the connection and model, then connect the JavaScript node to its messages socket and the Prose node to its system socket. Set max_turns to control how many tool call actions the agent is allowed to take in one reply. Keep it low for using closely back and forth, and raise it high if you prefer multi-step and complex tasks.
The agent node has 3 relevant output sockets:
messages, returns the full new conversation transcript, which is what you'd store between rounds to keep the conversation goingnew_messages, a subset ofmessages, containing only the new responses to add (contains multiple responses, tool calls, and their results)intermediate, a special socket that will be invoked while the agent is still processing, allowing you to return or respond with data such as tool calls or intermediate responses while the agent is still processing all turns.
Note: depending on system prompt, max_turns, the speed of the AI provider, and the task, an AI agent may run for a long time, so make sure to set the workflow timeout adequately in settings.
7. Reply. Add a JavaScript node with sockets message and new_messages, fed by the trigger and the new_messages output:
const text = inputs.new_messages
  .filter(entry => entry.kind.type === "assistant_message")
  .map(entry => entry.kind.text)
  .join("\n\n");

if (text === "") {
  throw new Error("The conversation completed without an assistant response.");
}

return { chat_id: inputs.message.chat_id, text };
Add a Telegram Send node after it, select the same connection, and set Chat ID to {{ input.chat_id }} and Text to {{ input.text }}.
8. Save the transcript. Add one more JavaScript node with sockets message and messages, fed by the trigger and the messages output:
const chatId = String(inputs.message.chat_id);

return {
  id: chatId,
  chat_id: chatId,
  transcript: inputs.messages,
  updated_at: new Date().toISOString()
};
Connect it to a second Table node on Agent Conversation Data with the operation set to Upsert. This will store the new conversation context in the data table, allowing the result to be visible for the next turn.
Note: if the LLM runs out of context, the AI agent node can automatically compact. Turn on auto_compact on the node, it is off by default. Compaction yields a compaction entry, with the agent continuing from a summary. The past history is still stored, and does not need to be separately managed, as only the section behind the last compaction is fed to the LLM.
Testing the Agent#
Make sure the workflow is enabled, and send a message to your bot. It should now respond back, with an adequate response to your query depending on the personality you gave it.
However, since it has no tools, it can not do or perform any action against your workspace, and is only able to send and respond to messages.
Giving the Agent Tools#
Tools are what turns a chat AI into a proper agent. Tools are just nodes that emit data, describing the tool it uses, not any magic. The AI node can receive optional tools in its tools socket.
To start, add a Task Tools node, and connect it to the AI agent inbetween a Flatten node.
This node will expose tools that allow the agent to access your task system, allowing it to create, update, or schedule tasks.
To add more tools, simply add the relevant tool node, and connect it to the flatten node.
To interface with e.g; Google Workspaces, Notion, Firecrawl search, or similar other external sources, simply add the relevant Connection in settings, and configure the relevant tool node.
To give the agent your own structured data, add a Table Tools node and pick a table. It composes one tool per operation, named from the table — reading_list_query, reading_list_add, and so on — each carrying that table's declared columns in its parameter schema, and each able to reach nothing else. See Tables and Agent Tools.
If you want to add custom tools, you can create a workflow and add it as a tool with the Subworkflow Tool node. The arguments the AI provides when calling the tool is passed as inputs to the workflow, and the output of the workflow is returned to the AI.
Data from the outer workflow can be fed into the subworkflow execution by turning on Supply Context, which passes this node's input data alongside the arguments the AI supplied. This is useful to include operational data like ids, or context the workflow needs, that the AI should not handle or be able to change. With it off, the subworkflow's context arrives empty.
Next steps#
Once the agent responds and can use tools, Making Your Agent More Advanced adds voice notes, photos, live progress updates while it works, and typing indicators.